- Afghanistan
- Åland Islands
- Albania
- Algeria
- American Samoa
- Andorra
- Angola
- Anguilla
- Antarctica
- Antigua and Barbuda
- Argentina
- Armenia
- Aruba
- Australia
- Austria
- Azerbaijan
- Bahamas
- Bahrain
- Bangladesh
- Barbados
- Belarus
- Belgium
- Belize
- Benin
- Bermuda
- Bhutan
- Bolivia
- Bonaire, Sint Eustatius, and Saba
- Bosnia and Herzegovina
- Botswana
- Bouvet Island
- Brazil
- British Indian Ocean Territory
- British Virgin Islands
- Brunei
- Bulgaria
- Burkina Faso
- Burundi
- Cambodia
- Cameroon
- Canada
- Cape Verde
- Cayman Islands
- Central African Republic
- central square ny
- Chad
- Chile
- China
- Christmas Island
- Cocos [Keeling] Islands
- Colombia
- Comoros
- Cook Islands
- Costa Rica
- Croatia
- Cuba
- Curaçao
- Cyprus
- Czech Republic
- Congo - Kinshasa
- Denmark
- Djibouti
- Dominica
- Dominican Republic
- Timor-Leste
- Ecuador
- Egypt
- El Salvador
- Equatorial Guinea
- Eritrea
- Estonia
- Ethiopia
- Falkland Islands
- Faroe Islands
- Fiji
- Finland
- France
- French Guiana
- French Polynesia
- French Southern Territories
- Gabon
- Gambia
- Georgia
- Germany
- Ghana
- Gibraltar
- Greece
- Greenland
- Grenada
- Guadeloupe
- Guam
- Guatemala
- Guernsey
- Guinea
- Guinea-Bissau
- Guyana
- Haiti
- Heard Island and McDonald Islands
- Honduras
- Hong Kong SAR China
- Hungary
- Iceland
- India
- PAN (Presence Across Nation)
- Indonesia
- Iran
- Iraq
- Ireland
- Isle of Man
- Israel
- Italy
- Côte d’Ivoire
- Jamaica
- Japan
- Jersey
- Jordan
- Kazakhstan
- Kenya
- Kiribati
- Kosovo
- Kuwait
- Kyrgyzstan
- Laos
- Latvia
- Lebanon
- Lesotho
- Liberia
- Libya
- Liechtenstein
- Lithuania
- Luxembourg
- Macau SAR China
- Macedonia
- Madagascar
- Malawi
- Malaysia
- Maldives
- Mali
- Malta
- Marshall Islands
- Martinique
- Mauritania
- Mauritius
- Mayotte
- Mexico
- Micronesia
- Moldova
- Monaco
- Mongolia
- Montenegro
- Montserrat
- Morocco
- Mozambique
- Myanmar [Burma]
- Namibia
- Nauru
- Nepal
- Netherlands
- Netherlands Antilles
- New Caledonia
- New Zealand
- Nicaragua
- Niger
- Nigeria
- Niue
- Norfolk Island
- North Korea
- Northern Mariana Islands
- Norway
- Oman
- Pakistan
- Palau
- Palestinian Territories
- Panama
- Papua New Guinea
- Paraguay
- Peru
- Philippines
- Pitcairn Islands
- Poland
- Portugal
- Puerto Rico
- Qatar
- Congo - Brazzaville
- Réunion
- Romania
- Russia
- Rwanda
- Saint Barthélemy
- Saint Helena
- Saint Kitts and Nevis
- Saint Lucia
- Saint Martin
- Saint Pierre and Miquelon
- Saint Vincent and the Grenadines
- Samoa
- San Marino
- São Tomé and Príncipe
- Saudi Arabia
- Senegal
- Serbia
- Serbia and Montenegro
- Seychelles
- Sierra Leone
- Singapore
- Sint Maarten
- Slovakia
- Slovenia
- Solomon Islands
- Somalia
- South Africa
- South Georgia and the South Sandwich Islands
- South Korea
- South Sudan
- Spain
- Sri Lanka
- Sudan
- Suriname
- Svalbard and Jan Mayen
- Swaziland
- Sweden
- Switzerland
- Syria
- Taiwan
- Tajikistan
- Tanzania
- Thailand
- Togo
- Tokelau
- Tonga
- Trinidad and Tobago
- Tunisia
- Turkey
- Turkmenistan
- Turks and Caicos Islands
- Tuvalu
- U.S. Virgin Islands
- Uganda
- Ukraine
- United Arab Emirates
- United Kingdom
- United States
- U.S. Minor Outlying Islands
- Uruguay
- Uzbekistan
- Vanuatu
- Vatican City
- Venezuela
- Vietnam
- Wallis and Futuna
- Western Sahara
- Yemen
- Zambia
- Zimbabwe
Top 10 Excel Tips for Beginners
 by Admin
- 27, Jul 2024
Top 10 Excel Tips for Beginners
📊 Excel can seem daunting at first, but with a few tips and tricks, you'll be navigating your spreadsheets like a pro in no time. Here are the top 10 Excel tips for beginners:
1. Use Keyboard Shortcuts ⌨️
Speed up your work by mastering a few essential keyboard shortcuts:
- Ctrl + C: Copy
- Ctrl + V: Paste
- Ctrl + Z: Undo
- Ctrl + A: Select All
- Ctrl + S: Save
2. Autofill for Quick Data Entry 🔄
Autofill can save you time when entering repetitive data. Just type the initial values in a series, select them, and drag the fill handle (a small square at the bottom-right corner of the selection) to fill the rest.
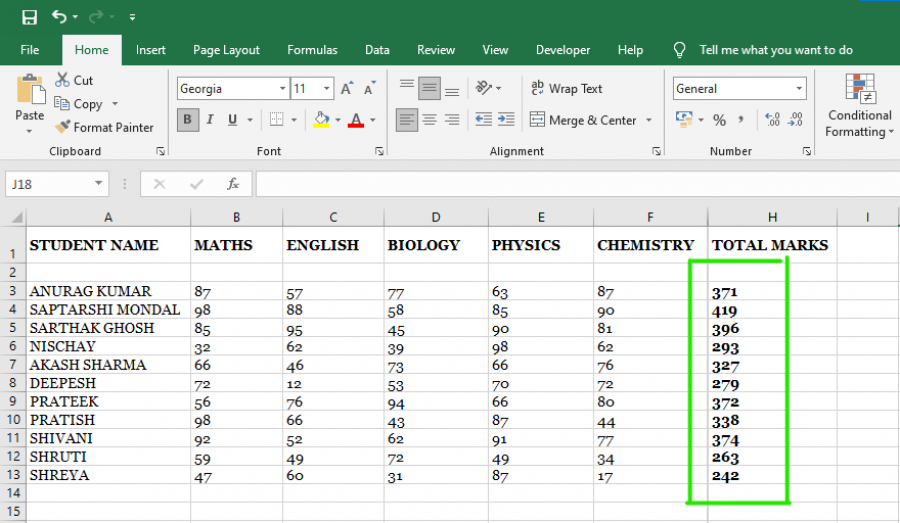
3. Use Formulas for Calculations ➗
Excel formulas are powerful tools. Start with basic ones like:
- SUM(): Adds a range of cells.
- AVERAGE(): Calculates the average of a range.
- MIN() and MAX(): Finds the minimum and maximum values in a range.
=SUM(A1:A10)
=AVERAGE(B1:B10)
=MIN(C1:C10)
=MAX(D1:D10)
4. Format Cells for Better Readability 🎨
Improve the readability of your data by formatting cells. You can change fonts, colors, borders, and number formats. Use the "Home" tab to access these options.
5. Use Conditional Formatting 📈
Highlight important data with conditional formatting. For example, you can automatically color cells based on their values:
- Select the range of cells.
- Go to Home > Conditional Formatting.
- Choose a rule, like "Greater than" or "Top 10%".
6. Freeze Panes to Keep Headers Visible 🧊
Keep your headers in view while scrolling by freezing panes:
- Select the row below your headers.
- Go to View > Freeze Panes.
- Choose Freeze Top Row or Freeze Panes.
7. Split Data into Columns with Text to Columns 🗂️
If you have data in one column that needs to be split into multiple columns, use Text to Columns:
- Select the column.
- Go to Data > Text to Columns.
- Follow the wizard to split your data.
8. Sort and Filter Data for Easy Analysis 🔍
Sort and filter your data to find what you need quickly:
- Select your data range.
- Go to Data > Sort to arrange data.
- Use Data > Filter to display only the data that meets certain criteria.
9. Create Charts for Data Visualization 📊
Visualize your data with charts:
- Select your data range.
- Go to Insert > Chart.
- Choose the chart type that best represents your data.
10. Protect Your Work with Autosave and Backup 💾
Ensure you don't lose your work by enabling autosave and creating backups:
- Use Ctrl + S frequently.
- Set up Autosave in File > Options > Save.
- Regularly back up your files to cloud storage like OneDrive or Google Drive.
By mastering these tips, you'll be well on your way to becoming an Excel expert. Happy spreadsheeting! 🥳


Our Aim is to Serve All Kinds of Jobs in Corporate Industries and the IT sector and all Business and Job Seekers are to easily find their deserve Platform.
